
Create a Vendor Account
You can create a vendor account if you have the following permissions in Polaris System Administration (web-based):
-
Vendor Accounts: Access
-
Vendor Accounts: Create
For more information about system administration permissions, see System Administration Permissions Reference.
To create a vendor account
-
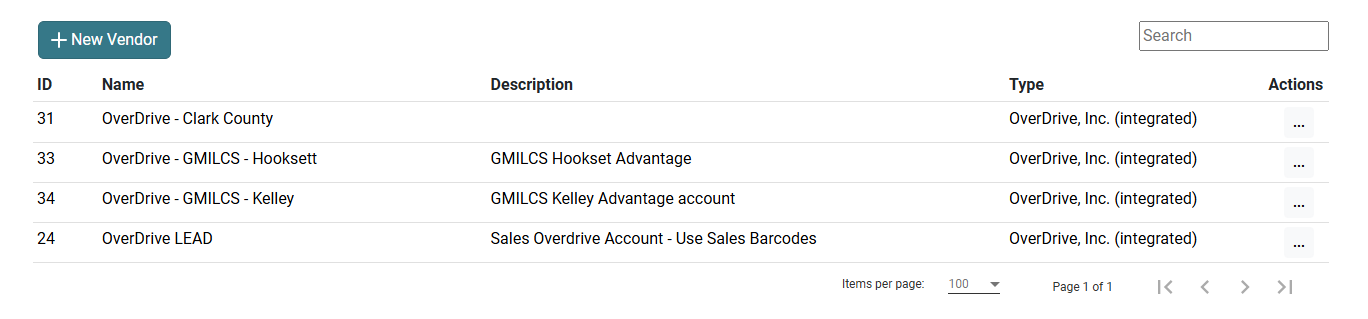
On the Polaris System Administration (web-based) Home page, select Vendor Accounts.
The Vendor Accounts page appears, with a list of vendor accounts. Each vendor account is listed with an ID, Name, Description, and Type.
-
Select New Vendor.
A New Vendor dialog appears.
-
From the Select vendor account type dropdown list, select a vendor account type. The following account types are available:
- CloudLibrary
-
boundless
-
Generic
-
OverDrive non-integrated
-
OverDrive integrated
-
Select OK.
-
-
A new Vendor Account workform appears. Workform fields depend on the vendor account type.
Note:
Required fields are in bold. For example: Vendor contract ID.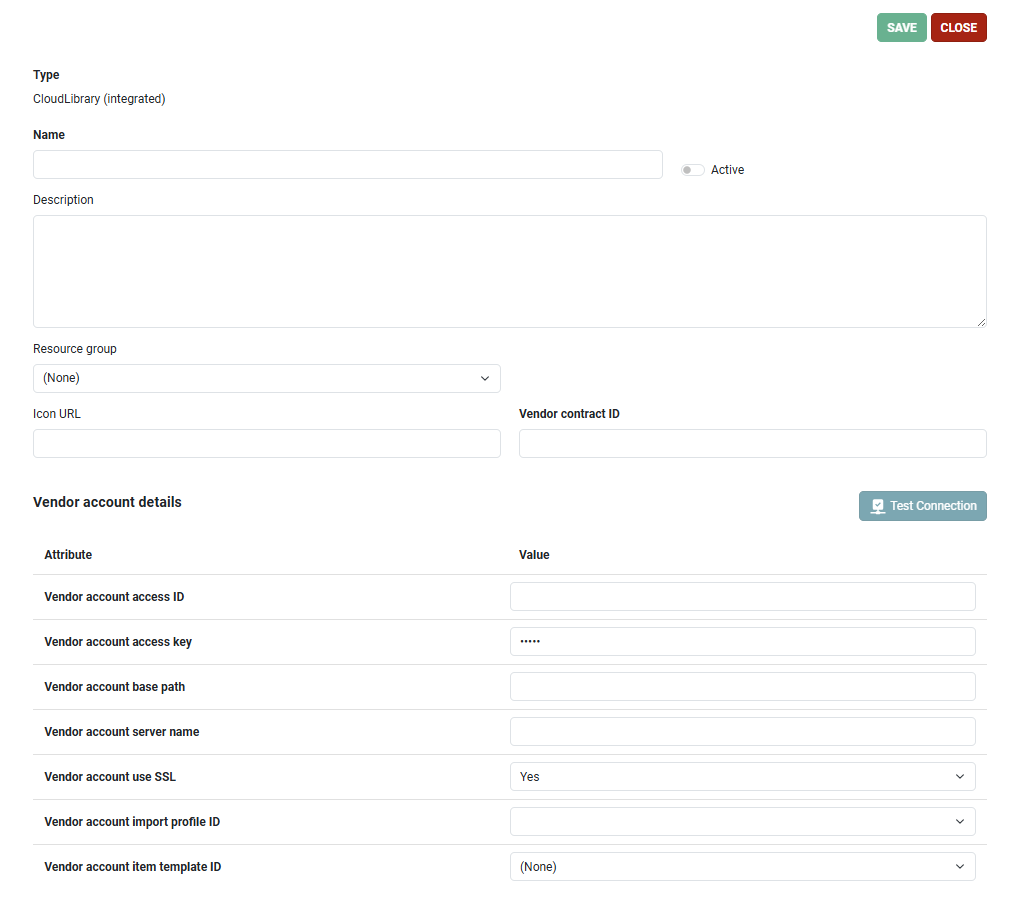
For instructions on how to complete a workform for each vendor account type, see the following sections:
-
Create an OverDrive integrated Vendor Account
Note:
If your library uses the cloudLink feature for sharing CloudLibrary titles among multiple libraries, you can set a preferred vendor account per organization in the Preferred Vendor Accounts table in Settings and Tables.
Create a CloudLibrary Vendor Account
To create a CloudLibrary vendor account
-
In the Name field, enter a unique vendor account name.
-
Turn on the Active toggle.
-
(Optional) In the Description box, enter a description of the vendor account.
-
(Optional) From the Resource group dropdown list, select a resource group. For more information about resource groups, see Resource Groups.
-
(Optional) In the Icon URL field, add a URL location of the icon that represents the eContent vendor.
-
In the Vendor contract ID, enter the vendor’s contract ID. The contract ID must be unique, and it can contain up to 255 characters.
-
In the Vendor account details section, define the following attribute values:
Vendor account access ID - Enter the library’s access ID for the eContent vendor account.
Vendor account access key - Enter the library’s access key for the eContent vendor account.
Vendor account base path - Enter the URL path to the library’s resources at eContent vendor.
Vendor account server name - Enter the vendor account server name.
Vendor account use SSL - Select Yes or No to indicate whether Secure Socket Layer is used.
Vendor account import profile ID - Select the import profile for automatic API-driven imports for the integrated eContent vendor.
Vendor account item template ID - Select the item template used during the automatic API-driven import process.
-
Select SAVE.
-
Click the Test Connection button to test the API settings in the vendor account and ensure that a connection is made to the vendor’s service. If the test was successful, a success notification appears.
Create boundless Vendor Account
To create a boundless vendor account
-
In the Name field, enter a unique vendor account name.
-
Turn on the Active toggle.
-
(Optional) In the Description box, enter a description of the vendor account.
-
(Optional) From the Resource group dropdown list, select a resource group. For more information about resource groups, see Resource Groups.
-
(Optional) In the Icon URL field, add a URL location of the icon that represents the eContent vendor.
-
In the Vendor contract ID, enter the vendor’s contract ID. The contract ID must be unique, and it can contain up to 255 characters.
-
In the Vendor account details section, define the following attribute values:
-
Vendor account access ID - Enter the library’s access ID for the eContent vendor account.
-
Vendor account access key - Enter the library’s access key for the eContent vendor account.
-
Vendor account base path - Enter the URL path to the library’s resources at eContent vendor.
-
Vendor account server name - Enter the vendor account server name.
-
Vendor account use SSL - Select Yes or No to indicate whether Secure Socket Layer is used.
-
Vendor account item template ID - Select the account item template ID. The library creates the item template used during the API-driven processes. For Boundless, this template is used for added copies only. The item template name must begin with Ebook automatic import or E-book automatic import.
-
Content cafe cover image user name - Enter the content cafe cover image user name.
-
Content cafe cover image password - Enter the content cafe cover image password.
-
Library OAuth URL - Enter the URL used to grant the Polaris ILS an access token, which is used to access the Boundless API.
-
Default URL link text - Enter the value that identifies the URL link text and is also used as hover text for the vendor icon.
-
-
Select SAVE.
-
Click the Test Connection button to test the API settings in the vendor account and ensure that a connection is made to the vendor’s service. If the test was successful, a success notification appears.
Create a Generic Vendor Account
To create a Generic vendor account
-
In the Name field, enter a unique vendor account name.
-
Turn on the Active toggle.
-
(Optional) In the Description box, enter a description of the vendor account.
-
(Optional) From the Resource group dropdown list, select a resource group. For more information about resource groups, see Resource Groups.
-
(Optional) In the Icon URL field, add a URL location of the icon that represents the eContent vendor.
-
(Optional) In the Vendor contract ID, enter the vendor’s contract ID. The contract ID must be unique, and it can contain up to 255 characters.
-
In the Vendor account details section, define the following attribute values:
-
Vendor account identifier value - Enter the value that identifies the vendor’s account.
-
Vendor account identifier tag number - Enter the value that identifies the bib tag where the vendor account ID is located.
-
Vendor account identifier subfield - Enter the value that identifies the bib tag subfield where the vendor account identifier is found.
-
Vendor object identifier tag number - Enter the value that identifies the tag where the eContent object identifier is found.
-
Vendor object identifier subfield - Enter the value that identifies the tag subfield where the eContent object identifier is found.
-
(Optional) Vendor object identifier start value - Enter the value that specifies where the string that identifies the eContent object starts.
-
(Optional) Vendor object identifier end value - Enter the value that specifies where the string that identifies the eContent object ends. If the object identifier appears at the end of the subfield, this field can be left blank.
-
Vendor account URL and link text tag number - Enter the value that identifies the tag where the URL for the eContent and link text are found. These need to be in the same tag. This is the tag that becomes the resource entity for the non-integrated eContent bibliographic record.
-
Vendor account URL and link text indicator two - Enter the value that identifies the MARC second indicator value for the tag containing the URL and link text.
-
Vendor account URL subfield - Enter the value that identifies the subfield where the URL is located.
-
Vendor account link text subfield - Enter the value that identifies the subfield where the link text is located.
-
(Optional) Vendor account public note subfield - Enter the value that identifies the subfield for the public note.
-
(Optional) Vendor account nonpublic note subfield - Enter the value that identifies the non-public note subfield.
-
-
Select SAVE.
Create an OverDrive non-integrated Vendor Account
To create an OverDrive non-integrated vendor account
-
In the Name field, enter a unique vendor account name.
-
Turn on the Active toggle.
-
(Optional) In the Description box, enter a description of the vendor account.
-
(Optional) From the Resource group dropdown list, select a resource group. For more information about resource groups, see Resource Groups.
-
(Optional) In the Icon URL field, add a URL location of the icon that represents the eContent vendor.
-
In the Vendor contract ID, enter the vendor’s contract ID. The contract ID must be unique, and it can contain up to 255 characters.
-
In the Vendor account details section, define the following attribute values:
-
Vendor account identifier value - Enter the value that identifies the vendor’s account.
-
Vendor account identifier tag number - Enter the value that identifies the bib tag where the vendor account ID is located.
-
Vendor account identifier subfield - Enter the value that identifies the bib tag subfield where the vendor account identifier is found.
-
Vendor object identifier tag number - Enter the value that identifies the tag where the eContent object identifier is found.
-
Vendor object identifier subfield - Enter the value that identifies the tag subfield where the eContent object identifier is found.
-
(Optional) Vendor object identifier start value - Enter the value that specifies where the string that identifies the eContent object starts.
-
(Optional) Vendor object identifier end value - Enter the value that specifies where the string that identifies the eContent object ends. If the object identifier appears at the end of the subfield, this field can be left blank.
-
Vendor account URL and link text tag number - Enter the value that identifies the tag where the URL for the eContent and link text are found. These need to be in the same tag. This is the tag that becomes the resource entity for the non-integrated eContent bibliographic record.
-
Vendor account URL and link text indicator two - Enter the value that identifies the MARC second indicator value for the tag containing the URL and link text.
-
Vendor account URL subfield - Enter the value that identifies the subfield where the URL is located.
-
Vendor account link text subfield - Enter the value that identifies the subfield where the link text is located.
-
(Optional) Vendor account public note subfield - Enter the value that identifies the subfield for the public note.
-
(Optional) Vendor account nonpublic note subfield - Enter the value that identifies the non-public note subfield.
-
-
Select SAVE.
Create an OverDrive integrated Vendor Account
To create an OverDrive integrated vendor account
-
In the Name field, enter a unique vendor account name.
-
Turn on the Active toggle.
-
(Optional) In the Description box, enter a description of the vendor account.
-
(Optional) From the Resource group dropdown list, select a resource group. For more information about resource groups, see Resource Groups.
-
(Optional) In the Icon URL field, add a URL location of the icon that represents the eContent vendor.
-
In the Vendor contract ID, enter the vendor’s contract ID. The contract ID must be unique, and it can contain up to 255 characters.
-
In the Vendor account details section, define the following attribute values:
-
Vendor account access ID - Enter the library’s access ID for the eContent vendor account.
-
Vendor account access key - Enter the library’s access key for the eContent vendor account.
-
Vendor account base path - Enter the URL path to the library’s resources at eContent vendor.
-
Vendor account server name - Enter the vendor account server name.
-
Vendor account import profile ID- Select the import profile for automatic API-driven imports for the integrated eContent vendor.
-
Vendor account item template ID - Select the account item template ID. The library creates the item template used during the API-driven processes. For Boundless, this template is used for added copies only. The item template name must begin with Ebook automatic import or E-book automatic import.
-
Library OAuth URL - Enter the URL used to grant the Polaris ILS an access token, which is used to access the Boundless API.
-
Patron OAuth URL - Enter the URL used to grant the Polaris ILS an access token for patron circulations.
-
Patron API URL - Enter the URL used to perform circulation functions.
-
Library web-site ID - Enter the web site ID used by OverDrive to identify the library’s collection for circulation purposes.
-
Default URL link text - Enter the value that identifies the URL link text and is also used as hover text for the vendor icon.
-
ILS name - Enter the name that identifies the ILS.
-
(Optional) OverDrive Advantage account ID - This field is required only for OverDrive Advantage accounts.
-
-
Select SAVE.
-
Click the Test Connection button to test the API settings in the vendor account and ensure that a connection is made to the vendor’s service. If the test was successful, a success notification appears.
